[Solved] The Disk Image Couldn’t Be Opened on Mac

If you are troubled by the ‘The disk image couldn’t be opened’ error on your Mac, this post covers all the steps to get your disk image back in order, from re-downloading the disk image to verifying and repairing it.
When Mac users need to download an app from an independent developer or any other tool that isn’t available in the App Store, users will obtain it as a compressed disk image (usually with a .dmg extension on macOS). The disk image can then be mounted as a virtual disk and put into use.
Unfortunately, Mac users sometimes encounter the dreaded ‘The disk image couldn't be opened’ prompt and are informed the disk image is corrupted. How do you fix the following disk images that couldn’t be opened on a Mac? This post is your ultimate guide.
What is a Disk Image?
A disk image contains a data storage device's complete contents and structure, such as a hard drive, CD/DVD, or USB drive. In macOS, disk images usually have a .dmg extension and are often used to distribute software, create backups, or clone storage devices. These disk images can be mounted in Finder, showcasing like any other volume. In Disk Utility, you can create, convert, and manage disk images.
One big usage of disk images is for distributing Mac software, as they allow developers to control the presentation of their software when the image is opened. For example, if you’ve ever downloaded an application that instructs you to move the app's binary file into the Applications folder, this process is facilitated by using a disk image. What if one day you are prompted ‘The disk image couldn't be opened’? Below are solutions to solve this Mac error.
Related Article: How to Find and Delete DMG Files on Mac
How to Fix the "The Disk Image Couldn't Be Opened" Error on Mac
Method 1. Re-download the Disk Image
Corrupted disk images can occur due to an unstable network, malware attacks, or human interference. If you encounter the error prompt, the first thing to try is to re-download the disk image. This time, make sure the download process is running smoothly with a stable network. After re-downloading, double-click the file to check if it can now be opened.
Method 2. Verify the Disk Image
If unfortunately, the ‘The disk image couldn't be opened’ error still shows up even after you re-download the disk image, chances are there is something wrong with the mounter. How to make sure of it? You can verify the misbehaving disk image in Disk Utility, a macOS-integrated disk management tool. The verifying process checks file system structure, identifies corruption, ensures data integrity, and detects bad sectors.
Step 1: Go to Launchpad > Others > Disk Utility. Double-click to launch it.
Step 2: In the top-left menu bar of Disk Utility, click on Images. From the drop-down options, select Verify.


Step 3: Locate and select the disk image file from its stored location (usually in the Downloads folder).
Step 4: Click the Verify button and wait for the verification process to complete.
Once the verification process is finished, you’ll see a full report indicating whether the verification was successful or if any issues were found. Fortunately, Disk Utility has another feature, First Aid, to help you repair corrupted disk images.
Method 3. Repair the Corrupted Disk Image
After verifying the disk image, don’t rush to exit Disk Utility if it’s detected minor errors. Here’s how to use Disk Utility to repair corrupted disks.
Step 1: In the Disk Utility window, choose the disk image from the left sidebar.
Step 2: Select First Aid at the top bar. Click Run in the pop-up confirmation dialog.


Wait for the fixing process to finish. Luckily, you can solve the ‘The following disk images couldn’t be opened’ error on Mac.
Bonus Tip: Clean Up Your Mac for Optimal Disk Performance
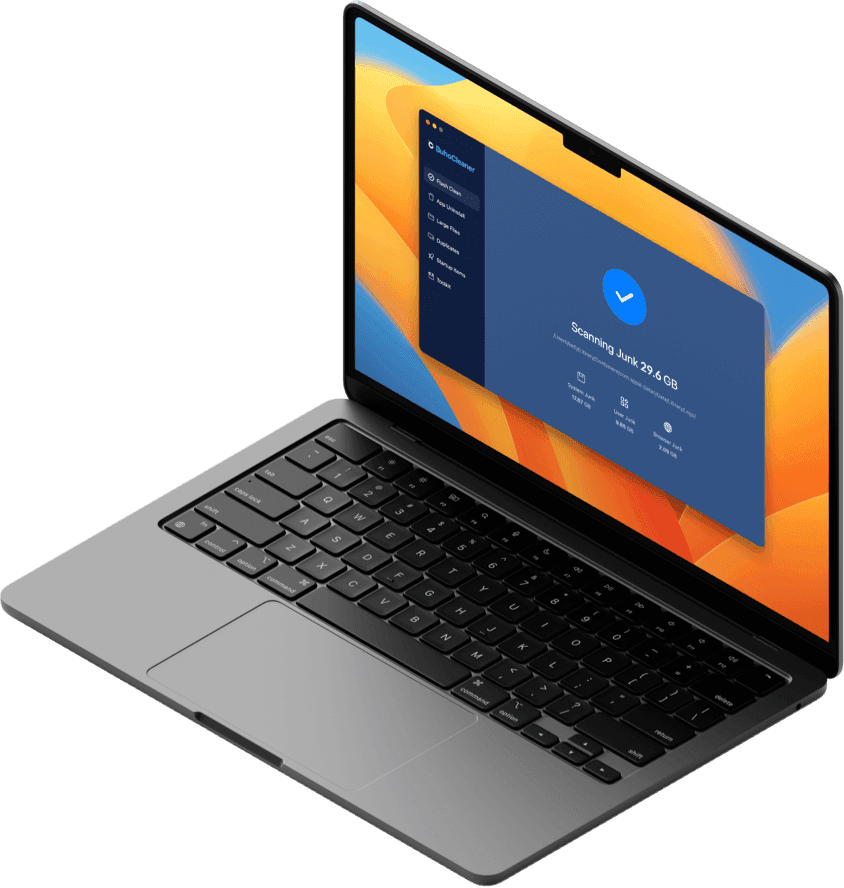
In addition to the disk image itself, your Mac can also be the culprit. Over time, files accumulate on your boot drive, causing conflicts and preventing disk images from opening correctly. BuhoCleaner is a great Mac cleaner that excels at optimizing your Mac storage, which can possibly resolve disk image errors by optimizing system performance and eliminating conflicts caused by accumulated junk files.
Here’s how:
First, download, install, and launch BuhoCleaner on your Mac.
To start with, go to the Flash Clean section to have an overview of the user cache, system logs, and junk files. Once the scan is complete, click the Remove button to remove these files from your system.


Based on your preference, go to Large Files, Duplicates, and Startup Items for a deeper and more thorough analysis of your Mac storage. Eliminate data and files you find unnecessary. After completing these steps, try opening the disk image again to see if the issue is resolved.
Conclusion
Encountering a ‘The disk image couldn’t be opened’ error on Mac stops you from accessing the application, but with the three approaches mentioned above, it's often fixable. You can re-download the disk image, verify it in Disk Utility, or give it a first-aid to help get your disk image back in working order. Additionally, cleaning up your Mac with tools like BuhoCleaner can optimize your system and prevent such errors from recurring. By following these methods, you can resolve the issue and continue using your Mac without any interruptions.
Jerome is a passionate enthusiast of all things Apple. He is expertise in crafting tech-related articles, with a portfolio of more than 100 articles covering various Apple products like the iPhone, iPad, and Mac.