"Your Disk Could Not Be Partitioned" in Boot Camp? 6 Fixes

If your startup disk cannot be partitioned in Boot Camp, you won't be able to install Windows on your Mac. To successfully create a Windows partition, try the 6 solutions in this article.
Apple makes it easy for Mac users to install and run Windows on a Mac computer with a built-in app called Boot Camp. Before Boot Camp Assistant guides you through the Windows installation process, it partitions your boot disk to create space for Windows.
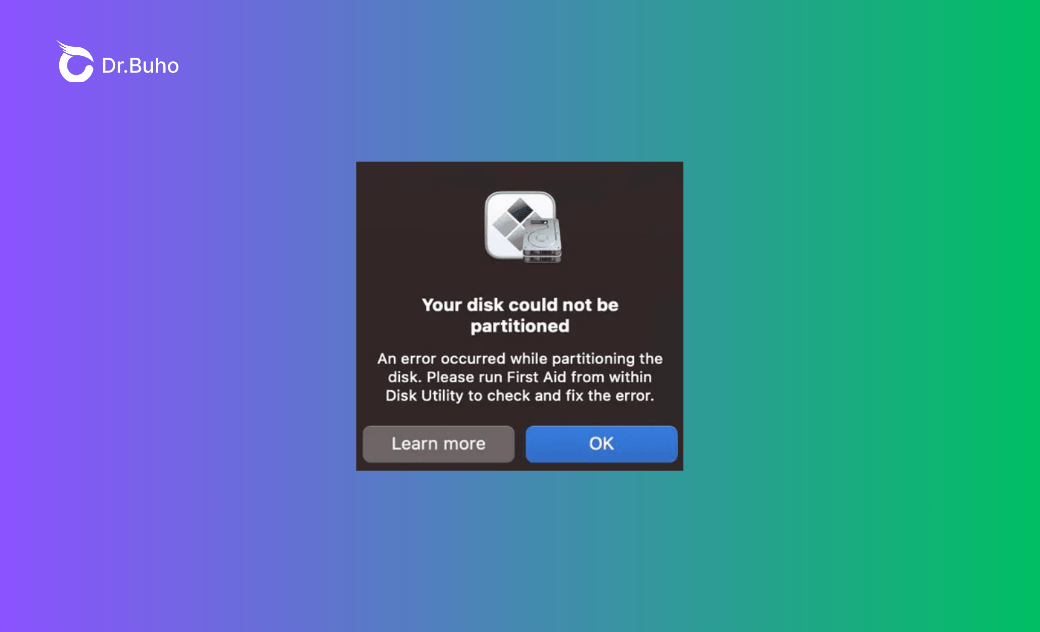
This process usually runs smoothly, but sometimes errors occur. One common Boot Camp error is that your disk could not be partitioned. The specific error message reads, "Your disk could not be partitioned. An error occurred while partitioning the disk. Please run First Aid from within Disk Utility to check and fix the error."
Other similar alerts include:
- The startup disk cannot be partitioned or restored to a single partition.
- The disk does not have enough space to be successfully partitioned.
- The startup disk does not have enough space to be partitioned.
In this article, we will show you what to do when Boot Camp cannot partition your Mac startup disk in 6 ways.
What Triggers The "Your Disk Could Not Be Partitioned" Error in Boot Camp?
The "your disk could not be partitioned" error indicates that Boot Camp Assistant is having trouble partitioning your Mac's boot disk. It can't place the necessary files to run macOS on one partition or install the firmware needed to run Windows on another partition. Several factors can cause this issue with Boot Camp:
- Your boot disk does not have enough free space to create a separate partition for the Windows installation.
- There are errors or corruption on your startup disk that prevent partitioning.
- When enabled, FileVault encrypts your entire disk, which can occasionally disrupt Boot Camp Assistant’s partitioning process.
- If the Time Machine is active, it generates snapshots of your disk that can make Boot Camp Assistant’s partitioning fail.
- Bugs or glitches in the Boot Camp utility can result in unsuccessful disk partitioning.
How to Fix the "Your Disk Cannot Be Partitioned" Error in Boot Camp on Mac
If you’re trying to install Windows on your Mac using Boot Camp but encounter the error "Your disk could not be partitioned," you can try these solutions.
1. Free up space on your startup disk
When you see an alert stating, "The disk does not have enough space to be successfully partitioned," along with information specifying the required amount of free space, it means your disk lacks the necessary free space for a separate Windows partition. If you plan to install Windows 11 on your Mac, Apple recommends having at least 64 GB of free space and 128 GB for an optimal experience. You'll need to free up your Mac before proceeding.


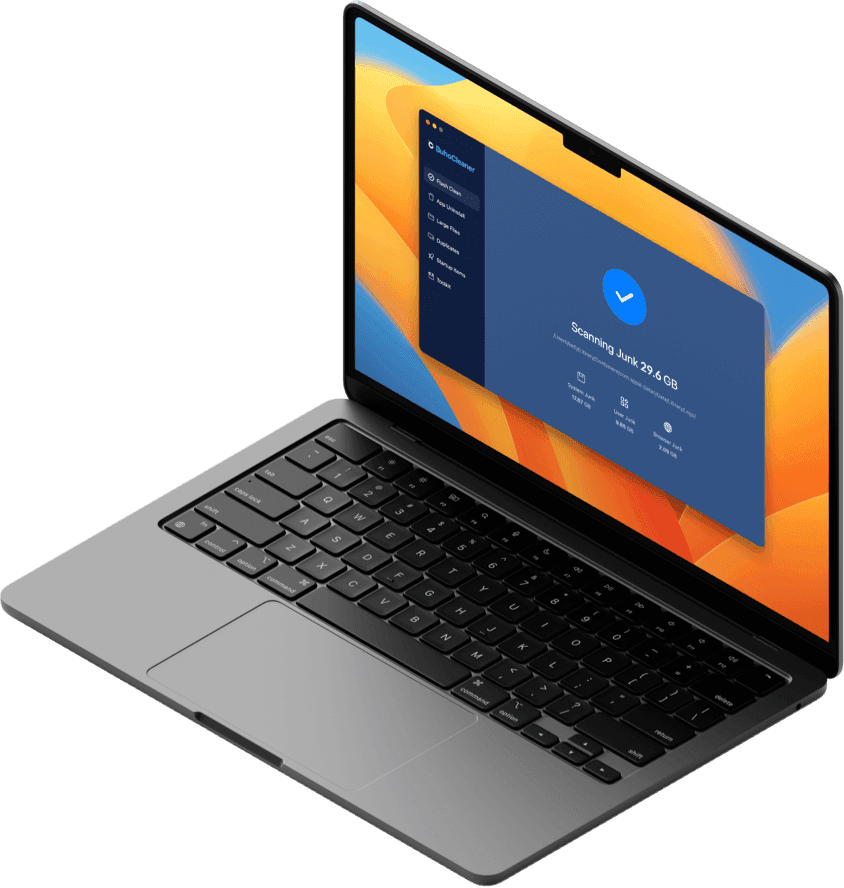
We recommend using a professional Mac cleaner like BuhoCleaner to make the work easier. It can help you identify and remove unnecessary files, ensuring that you have sufficient space and a well-maintained system for a smooth Boot Camp installation experience. Additionally, BuhoCleaner provides user-friendly interfaces and automated features, making the cleanup process quick and efficient.
How to free up your Mac with BuboCleaner:
Step 1. Download BuhoCleaner on your Mac and launch it.
Step 2. Use the Flash Clean option to clean out temporary files, caches, and other clutter from your Mac.


Step 3. Select App Uninstall and remove the applications you no longer need on your Mac.
Step 4. Click on Large Files to delete unwanted large files and release a significant amount of space immediately.


Step 5. Use the Duplicates option to get rid of any identical photos, videos, and documents to free up disk space.
2. Check for unallocated free space
It is possible that there is some free space on your startup disk that has not been assigned to any partition or volume, making it unavailable for Boot Camp. By removing this unallocated space, you can make it available, ensuring sufficient space for creating a partition to install Windows.
Here is how:
Step 1. Open Disk Utility.
Step 2. Select your boot disk, which is usually labeled as Macintosh HD or Apple SSD.
Step 3. Select Partition in the toolbar.
Step 4. If you see a message about Apple File System sharing space, click Partition to confirm you want to partition.
Step 5. If the pie chart has a section called Free Space, select it.


Step 6. Click the minus button underneath the chart to remove the unallocated free space and make it available for use.
Step 7. Click Apply and quit Disk Utility.
Step 8. Try running Boot Camp Assistant again.
3. Run First Aid to repair your startup disk
When the Boot Camp Assistant says that your disk cannot be partitioned, it suggests running First Aid to check and fix the error. To repair your startup disk, this operation needs to be performed in Mac Recovery Mode.
Step 1. Start your Mac into macOS Recovery.
Step 2. Select Disk Utility and click Continue in the macOS Utilities window.


Step 3. Choose View > Show All Devices from the menu bar or toolbar in Disk Utility. The sidebar in Disk Utility should now show your startup disk and any containers and volumes on that disk.
Step 4. Select the last volume of your startup disk, which should be Macintosh HD - Data.
Step 5. Click First Aid > Run.


Step 6. Repeat this process for each volume on the disk, then each container on the disk, and then, finally, the disk itself.
Step 7. When done, quit Disk Utility and restart your Mac
4. Turn off Time Machine and delete local snapshots
If the Time Machine automatic backup is enabled, it may interfere with the Boot Camp partitioning process. It is advisable to turn off Time Machine backup and delete local Time Machine snapshots while setting up your Mac to install Windows.
To disable Time Machine in macOS Monterey or earlier:
Step 1. Open the Apple menu and choose System Preferences.
Step 2. Choose Time Machine.
Step 3. Click the yellow padlock and enter your account password to unlock the settings.
Step 4. Uncheck the box next to Back Up Automatically.


To disable Time Machine in macOS Ventura or later:
Step 1. Open System Settings in the Apple menu.
Step 2. Select General on the left sidebar and click Time Machine to open its settings.
Step 3. Click the Options… button.
Step 4. Extend the drop-down menu next to Back up frequency and choose Manually.
Step 5. Click Done to complete the change.


To delete Time Machine local snapshots:
Step 1. Open Terminal on your Mac by opening Finder > Applications > Utilities.
Step 2. Type the following command and press Return. This will list all Time Machine local snapshots on your Mac.
tmutil listlocalsnapshots /
Step 3. Type the following command and press Return. This will delete all local snapshots.
for d in $(tmutil listlocalsnapshotdates | grep "-"); do sudo tmutil deletelocalsnapshots $d; done


Step 4. Enter your admin password and press Return.
Related Article: How to Delete Time Machine Backups to Free Up Disk Space
5. Disable FileVault temporarily
If the error persists after disabling the Time Machine backup and deleting local snapshots, the issue may be related to the FileVault feature. If you are using FileVault to encrypt your startup disk, you may need to turn it off before using Boot Camp.
Steps to turn off FileVault on a Mac running macOS Ventura or later:
Step 1. Go to the Apple menu and select System Settings.
Step 2. Click Security & Privacy.
Step 3. Scroll down to FileVault and click FileVault.
Step 4. Click the Turn Off button and click Turn Off Encryption to confirm.


Step 5. Enter your account password to authenticate.
6. Keep your macOS up-to-date
Before using Boot Camp to partition your boot disk and install Windows on your Mac, ensure you are running the latest version of macOS. This helps fix any underlying bugs or glitches in the system or Boot Camp, ensuring a smooth and successful experience. If your Mac is not up to date, follow this tutorial to update it.
Step 1. Go to the Apple menu > System Settings > General.
Step 2. Click Software Update.
Step 3. Click Update Now or Restart Now if there is an update available.


Last Words
When the Boot Camp Assistant warns you that your disk could not be partitioned, you can troubleshoot this error by starting with the following steps: update your macOS, turn off the Time Machine automatic backup, or turn off FileVault. If the partitioning failure is due to insufficient free space, you can use BuhoCleaner to efficiently free up Mac storage or remove any unallocated free space on your disk.
If your boot disk has errors that prevent proper partitioning, use Disk Utility in Recovery Mode to fix your Mac's hard drive. However, if Disk Utility finds an error but is unable to repair your startup disk, you may need to back up your Mac and erase the startup disk. Hopefully, these methods will resolve the "Your disk could not be partitioned" error.
Cassie has been writing about technology for her entire career life - over 5 years. She enjoys diving into how Apple products work and then breaking it down in a way anyone can understand.